Thursday, August 24, 2006

Disconnect This!


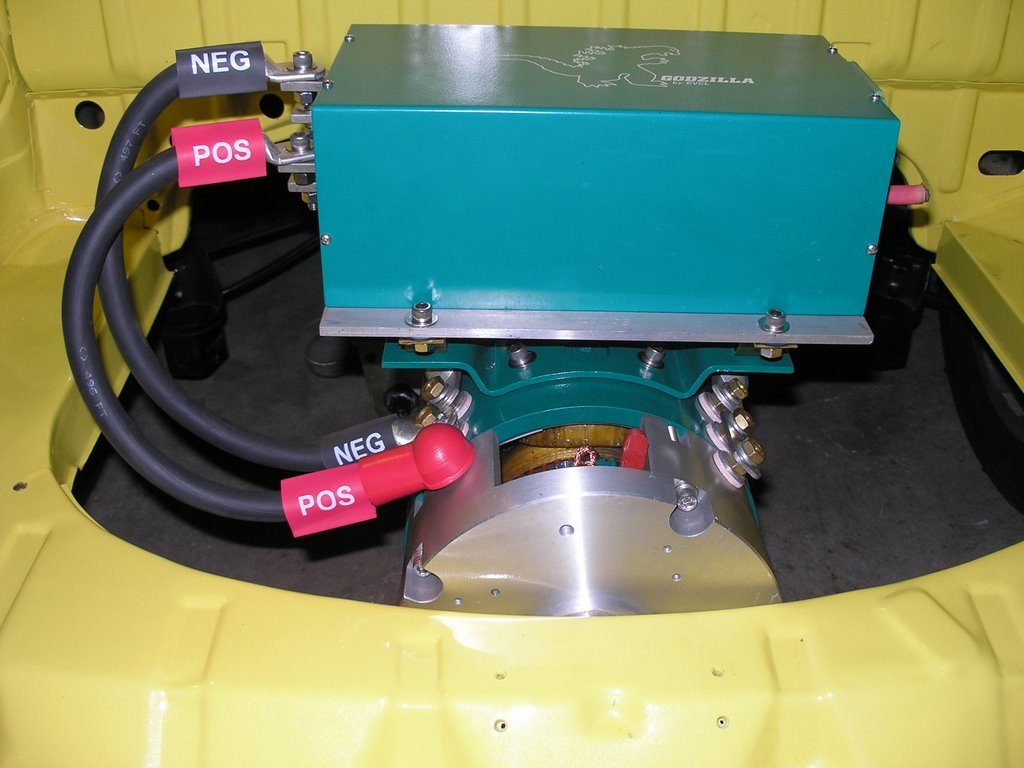
One component that is not currently available in an EV-specific form is a high voltage, high amperage circuit breaker and/or emergency disconnect. Each converter has to come up with his own solution, and they range from homebrew knife switches to springloaded Anderson connectors, to the simply effective industrial fuse holder used in White Zombie. I had the good fortune of being mentored by Dan Bortel, a local EV collector and recently-retired electrical engineer with an extensive collection of EVery imaginable form of surplus.
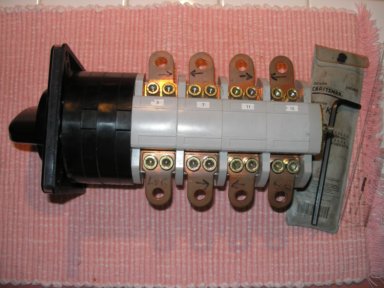
One of Dan's finds was a rotary switch from a huge Uninterruptible Power Supply. It is a set of four stackable contactors, activated by a springloaded, panel-mount rotary handle. The thing is rated for 600 volts, 200 amps per set of contacts. Luckily, the unit is made of lightweight thermoplastic, with most of the mass concentrated in copper and contact points. With four contacts in series, it should have no trouble handling anything I can dish out.

During the battery clamp fabrication with Marko, we whipped out an enclosure to mount this switch under my dashboard, and local motorcycle EV'er Damon Henry supplied some surplus busbar to link EVerything together!

Thursday, August 17, 2006

PFC20 Joins the Party


I had originally planned to place the Manzanita Micro PFC20 battery charger up front in the car, to have it close to the charging inlet (which resides in the old fuel filler, of course!), and that would have given me a pack voltage connection up front, which allows for mounting the dc-dc converter in clean dry place, and next to most of it's loads. However, there are drawbacks to having an extra HV run of cable going up front, and there was some difficulty shoehorning the charger in there. Instead, we opted to mount the charger on the motor bay firewall, squared up with Gamera and Godzilla. This puts all the pricey hardware incredibly close together, keeps cable runs to a minimum, simplifies the EV education mission, and also concentrates the eye candy. Thanks to the donation of high voltage standoffs and craftsmanship of Dan Bortel, PFC 20 is now sitting pretty. You'll notice that in this photo, the charger leads aren't yet connected, and the battery leads aren't in yet.

Sunday, August 13, 2006

A Cable for Mr. Gamera.


As sweet as the motor and controller looked sitting together, this union will never work without clear lines of communication. 4/0 welding cable should provide all the conduction required for a heated discussion, without letting the sparks fly!
Here is the 'motor loop', all cabled up, but not cinched down, and the heat shrink tubing has yet to be heated..

Wednesday, August 02, 2006

Godzilla Mounts Gamera (Rated G)


At last, this potent duo is joined!
You may recall that the Gamera Nine started off as a homely forklift motor, welded to a saddle for support. Since we went with a face mounting, the saddle wasn't required, but while Sir Jim was in a good mood (as he invariably is when playing with copper and steel), I got him to cut away that saddle, but not before drilling and tapping a set of holes for remounting the saddle, on either the top or bottom of the motor, should I so desire an accessory mounting platform.

I built some brass bracketry by bending straps around scrap wooden blocks and auto body dollys. Not only did they match the brass motor cable studs, but provide a bit of additional vibration isolation, with rubber washers and some built-in spring action... The advantages of this setup include minimizing the high amperage cable runs to all of ten inches, a compact and straightforward layout, no boring of holes through the fresh bodywork, and the perfect placement of Godzilla's cooling water manifold next to the Ghia air cleaner mount, upon which I will place the retasked oil bath air cleaner as a coolant reservoir, coolant pump, heat exchanger, and cooling fan.

You may have also noticed, by looking closely at the last photo, that the motor clearance against the rear valence is very tight. As a matter of fact, it was too tight. After all that measuring and machining, I wound up having to add a couple of shims to the transaxle mount, and that was all it took to push the motor back into the valence. However, the damage was minimal, and to prevent removal of too much material, I hand-filed the profile, and test fit it many times to achieve the result shown.