Back to the Beginning.
I got a bit ahead of myself with that news on the motor build.
When we last left our little yellow victim, it had been rescued from backyard oblivion, but we were discovering the unusual rust patterns that come from being closed up for 20 years in a humid environment. Besides a sheen of surface corrosion all over the interior, the big problem was in the floorpans. The natural jute padding used by Karmann was a great sponge, and kept moisture on the floorpan for decades, as they rusted from the inside out. What looked like a clean floorpan from below quickly crumbled with a gentle poke from my screwdriver. So, the pans have to be replaced. Since I was determined to build an EV, why not build custom reinforced battery boxes into this new pan? I gathered some 'worst case' battery dimensions and used up cores of batteries that I might use, such as the old standby flooded 6 Volt Trojan T-105 and the high performance absorbed glass mat Optima Yellow Top.
I measured clearances on the original floor pans, and sketched out some new pans that would hang a bit lower, since the Ghia had a very generous 8.5" ground clearance to begin with. This would be reduced to a minimum of 5", which very rarely scraped on my Miata, and would allow the tall T-105 to sit completely beneath the rear seat are on my Ghia.
Then it was time to remove the body, which was surprisingly easy, and start hacking!

Since the floorpans were coated with tar, it was hard to gauge the full extent of corrosion, and I wound up needing to cut farther than originally anticipated.
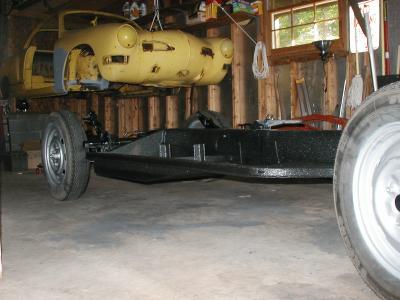
Quality replacement pans don't come cheap, and I already knew that stock pans wouldn't fit the batteries like I wanted, so a local welder agreed to tackle the job. We found that 1 1/4" square tubing was a perfect fit inside the chanel that runs around the perimeter of the pan, so we added it there for reinforcement in the critical rocker panel area, and also added a cross brace that would serve as the front edge of the battery box. From the front of this box, we angled back up and forward to the remaining original pan, and joined the two with a strong lap weld. Custom seat mounts were fabbed up,TIG welding was done all around, and the quality of that work was outstanding. Thanks go out to Rogers Welding of Woodstock, GA.

After welding, the entire chassis was sandblasted by The Dutchman of Woodstock, GA, and then the raw metal was given a thick coating of Line-X, except for suspension componenets, which I spraypainted with Hammerite.
posted by Jay Donnaway @ 7:00 AM
3 comments
![]()
![]()

3 Comments:
This comment has been removed by a blog administrator.
This comment has been removed by a blog administrator.
Your floor pans look great. It seems like I have a similar situation. Were the repairs costly for your ghia floor pans?
Post a Comment
<< Home